26 May Dr. Hagner – Application in Periodontics – F-Splint-Aid Slim
Application in Periodontics – F-Splint-Aid Slim
by Martin Hagner

Martin Hagner
Dr. Hagner graduated from the Dental Faculty of Bonn in 2003. Since 2010, he has achieved many post graduations in Periodontics and Implantology. From 2007 to 2010 he has been Researcher at the Polyclinic for periodontics, dentistry and preventive dentistry at the University of Bonn. Since 2011 Dr. Hagner has a practice in Germany dedicated to comprehensive dentistry. Beside his practice activities, he is a frequent speaker and lecturer in seminars and congresses. Dr.Hagner is also very active as author or co-author of scientific national and international publications.
case report
Tooth-splinting procedure is demonstrated on tooth 26 which was root amputated during resective surgical therapy in a patient with generalised severe chronic periodontitis and type II diabetes.
The first x-ray of the teeth shows the situation after anti-infective therapy and prior to endodontic treatment. The diagnosis was primary periodontal lesion with secondary endodontic involvement, with furcation defect degree III, which could be probed distally and vestibulary.
The second x-ray of the teeth shows the x-ray examination under a rubber dam during the endodontic treatment of tooth 26.
The third x-ray shows tooth 26 with the completed filling of the mesiovestibular and palatinal root canal. The distovestibular root canal contains a medicinal insert in form of calcium hydroxide. The pulp chamber and the upper part of the root canal are filled with a composite material, which also forms the cover filling.
The fourth x-ray image shows tooth 26 after root resection of the distal and palatinal root. During surgery it was displayed that the grade III furcation continued through the mesiopalatinal area. The palatinal root could no longer be preserved.
The fifth x-ray image shows tooth 26 splinted with F-Splint-Aid Slim at teeth 25 and 27.
This case study shows the tooth splint procedure with the F-Splint-Aid Slim System, using the direct adhesive technique.

1a: X-Ray images 1-3 (from left to right).

1b: X-Ray images 4-5 (from left to right).

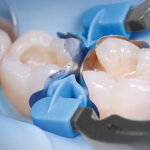
2: Excavated situation of teeth 25-27 under rubber dam, with sectional matrix applied mesialy at tooth 25.

3: Palatinal view of the excavated situation of teeth 25-27.

4: Total etch procedure of the excavated situation with blue etch gel.

5: Conditioned cavities of teeth 25-27 with bonding.

6. Built-up mesial ridge of tooth 25 after removal of the sectional matrix as well as underfilling with flow composite at tooth 27.

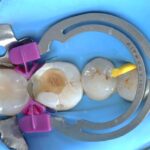
7. F-Splint-Aid Slim strip is pulled out from the light-protected storage bottle using tweezers.

8. Length-adaptable fiberglass ribbon F-Splint-Aid Slim with application clasp between teeth 26 and 27.

9. F-Splint-Aid Slim fiberglass ribbon is fixed with flow-composite in cavities of teeth 25-27.

10. Completed composite restoration of teeth 25-27 with integrated fiberglass splinting.

11. Palatinal view of the restored teeth after splinting with F-Splint-Aid Slim

12. Occlusal view of the tooth splinting after removal of the rubber dam.

13. Contact points of the restored teeth marked by blue paper. Tooth 26 with reduced numbers of roots was designed with a reduced orovestibulary width with subsequent static contact on the buccal triangular tubers to prevent shearing forces.

14. Palatinal view of the completed restorations.

15: Buccal view after tooth splinting in intercuspidation.
conclusions
From my point of view, the biggest advantage of F-Splint-Aid Slim is the stable, woven structure of the splint material, as well as its practical light-proof packaging. Another advantage is offered by the included “Clip&Splint” autoclavable plastic application clips for fixing the splint materials to the teeth.

other clinical cases
-
Class II adjacent cavities on 1st and 2nd molars – QuickmatFIT anatomical sectional matrices & myRing Forte – Dr David Gerdolle
A 28-year-old female patient, without any systemic medical conditions presented with a carious lesion affecting both molar 46D and 47M. The following case illustrates the direct composite restoration of the lesion using the Polydentia QuickmatFIT anatomical sectional matrices in combination with myRing Forte and myWedge plastic v-shaped wedges....
-

Class II cavity direct composite restoration on a young permanent premolar – myClip 2.0 – Dr Marina Papachroni
For young patients rebuilding the anatomy in class II cavity restorations is a major issue but not making too many occlusal adjustments after finishing the layering procedures is one of the same importance aspects. The following images show the step-by-step treatment we performed for treating decay on the upper first premolar of a 15-year-old teenager. ...
-
Class II cavity direct restoration on young permanent molar with myQuickmat Forte – Dr Marina Papachroni
Class II (interproximal) decay involves the proximal surface of a posterior tooth and it is a common occurrence in many dental patients. One challenge for the clinician is to accurately recreate a physical contact to the adjacent tooth and, at the same time, to restore proper interproximal anatomic form. This case involves a teenager 16 years old with an interproximal lesion in his left lower molar (#36)....
-
Class II direct composite restoration on first premolar – QuickmatFLEX sectional matrices and myClip Junior – Dr Marina Papachroni
A male teenager came to our office feeling pain in the upper left quadrant. We proceeded with a Class II restoration of the first premolar without removing brackets. The following images show the step-by-step direct composite restoration procedure using the premolar sectional matrix QuickmatFLEX in combination with the paediatric sectional matrix ring myClip junior. ...
-

Class II restoration of a primary molar – myRing Junior – Dr Sabová
The young patient came for a periodic checkup. After a preliminary analysis we found a class II mesial carious lesion on primary molar 6.5. Since the dimensions of the carious lesion were limited, we decided to proceed with a direct composite restoration procedure using myJunior kit from Polydentia. ...
-
Class II restoration on a first molar – QuickmatFIT anatomical sectional matrices and myRing Forte – Dr Cristian Scognamiglio e Dr Alessandro Perucchi
The patient came for a consultation complaining of discomfort at tooth 36 when chewing. Molar 36 presented a very old composite restoration with initial disto-occlusal infiltration. We decided to carry out an OD restoration that also involved the buccal surface in order to replace the filling with a new aesthetic restoration. In this clinical case, we illustrate the procedure for the step-by-step restoration of tooth 36 using the Polydentia QuickmatFIT Molar sectional matrix in combination with the myQuickmat Forte sectional matrix ring....
-

Class II restoration on second bicuspid – myQuickmat Forte kit – Dr. Chiodera
The Polydentia myQuickmat Forte kit is a very effective system for posterior class II restorations....
-

Diamond24, 24 solutions for your restorations of Class II cavities
Diamond24 and myRing Classico: 24 solutions for your Class II restorations. Read the article written by Dr. Chiodera, which explains how to get great contact points with Diamond24 and myRing Classico for Class II cavity restorations. ...
-
Dr. Chiodera – Class III restoration – Unica anterior
The patient came to our attention for a regular check. A first analysis revealed a class III carious lesion on incisor 21. We decided to eliminate the carious lesion and proceed with a direct composite restoration of the cavity....
-
Dr. Chiodera – MOD restoration on first Molar – myQuickmat Classico kit
The Polydentia myQuickmat Classico kit is a very efficient system for posterior class II restorations....