15 Jul Dr. Lazar – Class III restoration – Unica anterior
class III restoration with Unica anterior
by Dan Lazar

Dr. Dan Lazar
Dan Lazar, graduated from the Faculty of Dentistry in 2005 in Cluj-Napoca, Romania, followed by many post-graduate trainings in prosthetic and restorative dentistry in Romania and Europe. From 2007-2009 he was teaching at the Faculty of Dentistry, Iuliu Hatieganu Cluj-Napoca,at the Restorative department. Since 2005-2016 is working in a private practice in Oradea, Romania. From 2016 he work in his private dental clinic- Clinica LAZAR. Since 2015 he is an Style Italiano member.Dan Lazar is lecturing in Romania and abroad since 2009 on different topics: direct composite restorations, anterior prosthodontics and dental photography.
case report
The patient came to our attention for esthetic rehabilitation; the analysis revealed a previous composite restoration on incisor 12 to be replaced and a carious lesion on canine 13. The following case shows the step-by-step direct restoration of incisor 12 using the Polydentia’s Unica anterior matrices.

1: Pre-operative view of incisors 12 and canine 13 evidencing the old composite restoration which should be replaced on #12.

2: The quadrant under isolation.

3: The clinical situation after removal of the old restoration on #12, removal of the carious lesion on #13 and cleaning of the proximal area.

4: Canine 13 was restored before proceeding with the procedure explained in this case study.
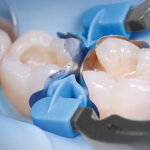
Unica anterior matrix was placed for the restoration of incisor 12 . The contoured shape of the matrix embraces the teeth and help the practitioner to better see where the proximal edge will be placed. In this case, the stability of the matrices itself does not require wedges or myCustom Resin to stay in position.

5: Restoration of the distal edge on incisor 12.

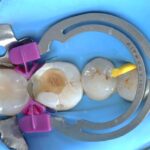
6: Incisor 12 after the removal of UNICA and contouring process of the restoration. The contoured proximal walls of the matrix ensure an accurate proximal morphology with minimal finishing.

7: The immediate post-operative view of the restoration after initial finishing and polishing. The final shaping and polishing procedure, not shown in this case was performed on a second session.
conclusion
Unica anterior powered by Style Italiano is a powerful tool for direct composite anterior restorations.
Thanks to its contoured shape, Unica adapts correctly to the different morphologies of anterior teeth and makes it possible to restore interproximal margins, even in case of extended Class III cavities where the tooth profile is missing.

other clinical cases
-
Class II adjacent cavities on 1st and 2nd molars – QuickmatFIT anatomical sectional matrices & myRing Forte – Dr David Gerdolle
A 28-year-old female patient, without any systemic medical conditions presented with a carious lesion affecting both molar 46D and 47M. The following case illustrates the direct composite restoration of the lesion using the Polydentia QuickmatFIT anatomical sectional matrices in combination with myRing Forte and myWedge plastic v-shaped wedges....
-

Class II cavity direct composite restoration on a young permanent premolar – myClip 2.0 – Dr Marina Papachroni
For young patients rebuilding the anatomy in class II cavity restorations is a major issue but not making too many occlusal adjustments after finishing the layering procedures is one of the same importance aspects. The following images show the step-by-step treatment we performed for treating decay on the upper first premolar of a 15-year-old teenager. ...
-
Class II cavity direct restoration on young permanent molar with myQuickmat Forte – Dr Marina Papachroni
Class II (interproximal) decay involves the proximal surface of a posterior tooth and it is a common occurrence in many dental patients. One challenge for the clinician is to accurately recreate a physical contact to the adjacent tooth and, at the same time, to restore proper interproximal anatomic form. This case involves a teenager 16 years old with an interproximal lesion in his left lower molar (#36)....
-
Class II direct composite restoration on first premolar – QuickmatFLEX sectional matrices and myClip Junior – Dr Marina Papachroni
A male teenager came to our office feeling pain in the upper left quadrant. We proceeded with a Class II restoration of the first premolar without removing brackets. The following images show the step-by-step direct composite restoration procedure using the premolar sectional matrix QuickmatFLEX in combination with the paediatric sectional matrix ring myClip junior. ...
-

Class II restoration of a primary molar – myRing Junior – Dr Sabová
The young patient came for a periodic checkup. After a preliminary analysis we found a class II mesial carious lesion on primary molar 6.5. Since the dimensions of the carious lesion were limited, we decided to proceed with a direct composite restoration procedure using myJunior kit from Polydentia. ...
-
Class II restoration on a first molar – QuickmatFIT anatomical sectional matrices and myRing Forte – Dr Cristian Scognamiglio e Dr Alessandro Perucchi
The patient came for a consultation complaining of discomfort at tooth 36 when chewing. Molar 36 presented a very old composite restoration with initial disto-occlusal infiltration. We decided to carry out an OD restoration that also involved the buccal surface in order to replace the filling with a new aesthetic restoration. In this clinical case, we illustrate the procedure for the step-by-step restoration of tooth 36 using the Polydentia QuickmatFIT Molar sectional matrix in combination with the myQuickmat Forte sectional matrix ring....
-

Class II restoration on second bicuspid – myQuickmat Forte kit – Dr. Chiodera
The Polydentia myQuickmat Forte kit is a very effective system for posterior class II restorations....
-
Diamond24, 24 solutions for your restorations of Class II cavities
Diamond24 and myRing Classico: 24 solutions for your Class II restorations. Read the article written by Dr. Chiodera, which explains how to get great contact points with Diamond24 and myRing Classico for Class II cavity restorations. ...
-
Dr. Chiodera – Class III restoration – Unica anterior
The patient came to our attention for a regular check. A first analysis revealed a class III carious lesion on incisor 21. We decided to eliminate the carious lesion and proceed with a direct composite restoration of the cavity....
-
Dr. Chiodera – MOD restoration on first Molar – myQuickmat Classico kit
The Polydentia myQuickmat Classico kit is a very efficient system for posterior class II restorations....