22 Sep Protecting the adjacent tooth – PolydentiaPRO interproximal protection matrix – DR. Chiodera
Protecting the adjacent tooth during cavity preparation and creating a custom wedge
by Dr. Giuseppe Chiodera

Dr Giuseppe Chiodera
Dr Chiodera graduated in Dentistry from the University of Brescia. In 2004, he won a scholarship to Kings College University in London. Honorary member of StyleItaliano, Dr Chiodera has been operating a private practice in Italy since 2006, specialising in conservative dentistry and endodontics. Dr Chiodera is also very active as an author of peer reviewed articles for national and international dental journals, as well as a lecturer at many universities.
clinical case
Protecting the adjacent tooth from nicks and scratches that occur during cavity preparation, when the bur inadvertently comes into contact with the neighbouring tooth, is essential to avoid damaging healthy tooth enamel.
The following documentation shows how these risks can be prevented using the new interproximal protection matrix PolydentiaPRO (Polydentia). It also displays how we created a valuable customised wedge that will be very useful during the restoration to achieve a correct result with a tight, anatomical contact point.

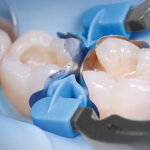
1: Pre-operative view showing the operating field with PolydentiaPRO inserted interproximally between carious molar #26 and premolar #25. The insertion of the matrix proved easy as the matrix, pre-shaped and contours, features extremities (as can be seen from the image) that serve as a guide to pull and slide the matrix through the interproximal space.

2:Unlike sectional matrices, we position PolydentiaPRO with the convex side facing the carious tooth. This placement provides it stability and the ability to withstand the force produced by the rotational movement of the bur. In addition, we have inserted a wedge to hold the matrix in place, thus achieving extra stability.

3:Opening the cavity with a dental bur. The use of a wooden wedge is not only advantageous for the stability of the matrix but also offers the clinician the possibility of obtaining a customised wedge, which is helpful for the creation of an anatomical and durable restoration (Back to Basics: Mind the Wedge – Chiodera 2017 [1]).

4: The image shows (source: Back to Basics: Mind the Wedge by Dr Chiodera 2017 [1]) the result of customising a wedge at the cavity opening. In this way, the customised wedge allows the matrix to anatomically close the space, allowing us to create a closed contact point and an anatomical, gap-free proximal margin.

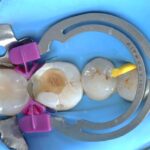
5: Occlusal view of the clinical area after preparation of molar #26 and removal of the wedge. Note how PolydentiaPRO forms a shield that protects the adjacent premolar. (As mentioned before, we kept the wedge for use during the adhesive procedure.)

6: This image shows the damage that would have occurred on the adjacent tooth had we not used PolydentiaPRO. By doing so, we were able to keep the proximal structure of the adjacent tooth intact, and save time for finishing and polishing.

7: Restauro finale senza diga di gomma. Notare il punto di contatto stretto tra i premolari.
Senza QuickmatFLEX, non sarebbe stato possibile ottenere il restauro specifico. Grazie alle sue caratteristiche tecniche, la matrice sezionale QuickmatFLEX è facile da maneggiare e si adatta allo stretto spazio interprossimale sotto il filo ortodontico.

8: Post-operative view of the restoration.

9: The direct restoration after the one-year recall. Notice the tight contact point and the ultimate perimeter of our restoration on molar #36.

10: Final restoration without rubber dam. Check the tight contact point between premolars.
conclusion
PolydentiaPRO is a simple yet effective matrix to protect adjacent teeth from bur damage that can occur during cavity preparation. Its use is simple, and its contoured nature facilitates placement and removal. Furthermore, it enables us to achieve better and more anatomical restorations by allowing for wedge customisation to the cavity opening. PolydentiaPRO offers excellent help in preserving the neighbouring tooth proximal surface intact and provides clear economic advantages as it saves the time to polish iatrogenic damage or even the need to perform a new restoration.
references
1- ack to Basics: Mind the Wedge – Article by DR Chiodera. Year 2017. Published on: https://www.styleitaliano.org/back-to-basics-mind-the-wedge/
DOWNLOAD PDF
Dr Chiodera - Protecting the adjacent tooth during cavity preparation and creating a custom wedge
Read More
other clinical cases
-
Class II adjacent cavities on 1st and 2nd molars – QuickmatFIT anatomical sectional matrices & myRing Forte – Dr David Gerdolle
A 28-year-old female patient, without any systemic medical conditions presented with a carious lesion affecting both molar 46D and 47M. The following case illustrates the direct composite restoration of the lesion using the Polydentia QuickmatFIT anatomical sectional matrices in combination with myRing Forte and myWedge plastic v-shaped wedges....
-

Class II cavity direct composite restoration on a young permanent premolar – myClip 2.0 – Dr Marina Papachroni
For young patients rebuilding the anatomy in class II cavity restorations is a major issue but not making too many occlusal adjustments after finishing the layering procedures is one of the same importance aspects. The following images show the step-by-step treatment we performed for treating decay on the upper first premolar of a 15-year-old teenager. ...
-
Class II cavity direct restoration on young permanent molar with myQuickmat Forte – Dr Marina Papachroni
Class II (interproximal) decay involves the proximal surface of a posterior tooth and it is a common occurrence in many dental patients. One challenge for the clinician is to accurately recreate a physical contact to the adjacent tooth and, at the same time, to restore proper interproximal anatomic form. This case involves a teenager 16 years old with an interproximal lesion in his left lower molar (#36)....
-
Class II direct composite restoration on first premolar – QuickmatFLEX sectional matrices and myClip Junior – Dr Marina Papachroni
A male teenager came to our office feeling pain in the upper left quadrant. We proceeded with a Class II restoration of the first premolar without removing brackets. The following images show the step-by-step direct composite restoration procedure using the premolar sectional matrix QuickmatFLEX in combination with the paediatric sectional matrix ring myClip junior. ...
-

Class II restoration of a primary molar – myRing Junior – Dr Sabová
The young patient came for a periodic checkup. After a preliminary analysis we found a class II mesial carious lesion on primary molar 6.5. Since the dimensions of the carious lesion were limited, we decided to proceed with a direct composite restoration procedure using myJunior kit from Polydentia. ...
-
Class II restoration on a first molar – QuickmatFIT anatomical sectional matrices and myRing Forte – Dr Cristian Scognamiglio e Dr Alessandro Perucchi
The patient came for a consultation complaining of discomfort at tooth 36 when chewing. Molar 36 presented a very old composite restoration with initial disto-occlusal infiltration. We decided to carry out an OD restoration that also involved the buccal surface in order to replace the filling with a new aesthetic restoration. In this clinical case, we illustrate the procedure for the step-by-step restoration of tooth 36 using the Polydentia QuickmatFIT Molar sectional matrix in combination with the myQuickmat Forte sectional matrix ring....
-

Class II restoration on second bicuspid – myQuickmat Forte kit – Dr. Chiodera
The Polydentia myQuickmat Forte kit is a very effective system for posterior class II restorations....
-
Diamond24, 24 solutions for your restorations of Class II cavities
Diamond24 and myRing Classico: 24 solutions for your Class II restorations. Read the article written by Dr. Chiodera, which explains how to get great contact points with Diamond24 and myRing Classico for Class II cavity restorations. ...
-
Dr. Chiodera – Class III restoration – Unica anterior
The patient came to our attention for a regular check. A first analysis revealed a class III carious lesion on incisor 21. We decided to eliminate the carious lesion and proceed with a direct composite restoration of the cavity....
-
Dr. Chiodera – MOD restoration on first Molar – myQuickmat Classico kit
The Polydentia myQuickmat Classico kit is a very efficient system for posterior class II restorations....